Metadata Capturing and Publishing
RF22: Create Metadata Record in Owned Organisation.
Applicable roles: Metadata Editor, Metadata Publisher and System Administrator
Procedure:
In the navigation bar, click on your 'Profile' and the click on 'Dashboard' from the dropdown menu

Then click on the 'My Organisations' tab

Click on one of the organisations listed and you will redirected to that organisations' home page. On the organisation home page, click on the 'Add metadata record' button

Fill in all the necessary information about the record. All fields marked with an asterisk (*) are mandatory. The information you add will become the information that is available on the EMC site about the record you are adding. When adding the metadata record thumbnail, make sure the image URL is a public image link and not a private one. Remember to also make sure that the image ratio is 1:1 for the best results.

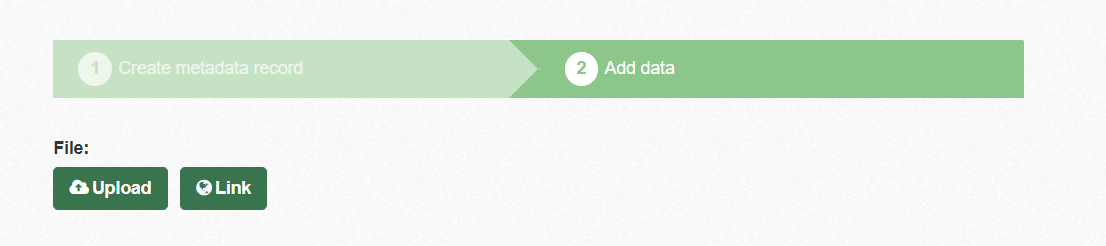
Once you are done, select ‘Next: Add links’ at the bottom of the page.

Add the link(s) and then select ‘Finish’ at the bottom of the page.

Expected results: Metadata records are created with a private status so that they do not become published until a user with a Metadata Publisher role approves them. Also, the metadata record conforms to SANS 1878.
RF23: Create Metadata Record Interactively via the System UI.
Applicable roles: Metadata Editor, Metadata Publisher and System Administrator
Procedure:
Method 1:
Select ‘Search Metadata’ in the navigation bar.

Select ‘Add metadata record’ which is located in the top right corner of the page.

Fill in all the necessary information about the record. All fields marked with an asterisk (*) are mandatory. The information you add will become the information that is available on the EMC site about the record you are adding. When adding the metadata record thumbnail, make sure the image URL is a public image link and not a private one. Remember to also make sure that the image ratio is 1:1 for the best results.
Once you are done, select ‘Next: Add links’ at the bottom of the page.
Add the link(s) and then select ‘Finish’ at the bottom of the page.
Method 2:
Select ‘Search Metadata’ in the navigation bar.
You can add a metadata record from an XML file by clicking on the button ‘Add metadata record from XML file’ and selecting the XML file you would like to upload (An example of an XML file that you need to create on your local machine can be found in RF24 below).

Method 3:
In the navigation bar, click on 'Publish Metadata'

On the loaded page, click on 'Manual Publication'

Fill in all the necessary information about the record. All fields marked with an asterisk (*) are mandatory. The information you add will become the information that is available on the EMC site about the record you are adding. When adding the metadata record thumbnail, make sure the image URL is a public image link and not a private one. Remember to also make sure that the image ratio is 1:1 for the best results.
Once you are done, select ‘Next: Add links’ at the bottom of the page.
Add the link(s) and then select ‘Finish’ at the bottom of the page.
Method 4:
In the navigation bar, click on 'Publish Metadata'
On the loaded page, click on 'XML UPLOAD'

Then select the XML file on your local machine (An example of an XML file that you need to create on your local machine can be found in RF24 below).
Expected results: Metadata records are created with a private status so that they do not become published until a user with a Metadata Publisher role approves them. Also, the metadata record conforms to SANS 1878.
RF24: Create Metadata Record Programmatically via the System API.
Applicable roles: Metadata Editor, Metadata Publisher and System Administrator
Procedure:
Create an XML file on your local machine (like the example below which contains the minimum number of fields for a valid .xml file to be created). Use a text file editor such as Notepad on Windows or the Gedit Text Editor on Linux.
<?xml version="1.0" encoding="UTF-8"?>
<dataset>

    <title>Example Title</title>

    <notes>Abstract of Metadata Record</notes>

    <private>True</private>

    <metadata_standard-0-name>SANS1878</metadata_standard-0-name>

    <metadata_standard-0-version>1</metadata_standard-0-version>

    <owner_org>organisation</owner_org>

    <responsible_party-0-individual_name>Hugh Mann</responsible_party-0-individual_name>

    <responsible_party-0-role>publisher</responsible_party-0-role>

    <responsible_party-0-position_name>Person</responsible_party-0-position_name>

    <responsible_party-0-electronic_mail_address>example@example.com</responsible_party-0-electronic_mail_address>

    <metadata_reference_date_and_stamp-0-reference>2004-11-03T01:00:00</metadata_reference_date_and_stamp-0-reference>

    <metadata_reference_date_and_stamp-0-reference_date_type>publication</metadata_reference_date_and_stamp-0-reference_date_type>

    <topic_and_sasdi_theme-0-iso_topic_category>society</topic_and_sasdi_theme-0-iso_topic_category>

    <lineage_statement>Statement of Lineage</lineage_statement>

    <metadata_language_and_character_set-0-dataset_language>english</metadata_language_and_character_set-0-dataset_language>

    <metadata_language_and_character_set-0-metadata_language>English</metadata_language_and_character_set-0-metadata_language>

    <metadata_language_and_character_set-0-dataset_character_set>UCS-2</metadata_language_and_character_set-0-dataset_character_set>

    <metadata_language_and_character_set-0-metadata_character_set>UCS-2</metadata_language_and_character_set-0-metadata_character_set>

    <distribution_format-0-name>format name</distribution_format-0-name>

    <distribution_format-0-version>1.0</distribution_format-0-version>

    <spatial>-22.1265,16.4699,-34.8212,32.8931</spatial>

    <spatial_parameters-0-equivalent_scale>24</spatial_parameters-0-equivalent_scale>

    <spatial_parameters-0-spatial_representation_type>001</spatial_parameters-0-spatial_representation_type>

    <spatial_parameters-0-spatial_reference_system>EPSG:4326</spatial_parameters-0-spatial_reference_system>

    <metadata_reference_date_and_stamp-0-stamp>2004-11-03T01:00:00</metadata_reference_date_and_stamp-0-stamp>

    <metadata_reference_date_and_stamp-0-stamp_date_type>Creation</metadata_reference_date_and_stamp-0-stamp_date_type>
</dataset>
Note: The filename extension must be .xml
The xml file should look something like this:

Note: Edit the XML file in your chosen text editor.
<title>Use this to give your metadata record a unique title/identifier. You will get an error if your title is not unique so change the title fromExample Titleto a unique one.
<notes>This is the abstract for the data so you should just add some useful extra notes about the record.
<private>This should be set toTrueorFalsedepending on whether or not you want the record to be private or public
<metadata_standard-0-name>This needs to be the name of the metadata standard that your record will follow (e.g. SANS1878).
<metadata_standard-0-version>Version of the metadata standard that your record follows.
-
<owner_org>Organisation responsible for the metadata record. This can be found at the end of the URL of the organisation page (e.g. if the URL for the organisation ishttps://catalogue-staging.sasdi.gov.za/organization/exampleyou would need to fillexamplein this field). You must be part of the organisation that you specify. Do not just use the organisation name you see on the page and do not use the organisation name in this example.

<responsible_party-0-individual_name>Name of the person responsible for the metadata record.
<responsible_party-0-roleResponsiblePartyRole>Role performed by the organisation responsible for this metadata record.
<responsible_party-0-position_name>Role or position of the person responsible for this metadata record.
<responsible_party-0-electronic_mail_address>Address of the electronic mailbox of the user organisation or individual responsible for this metadata record.
<metadata_reference_date_and_stamp-0-reference>This is the reference date and time of the metadata record. It must be in the yyyy-mm-ddTHH:MM:SS format (e.g 2023-04-12T13:15:36).
<metadata_reference_date_and_stamp-0-reference_date_type>This is limited by SANS to three choices (Creation,Publication, orRevision).
<topic_and_sasdi_theme-0-iso_topic_category>ISO 19115 Topic Category for the metadata record.
<lineage_statement>General explanation of the record producer's knowledge about the lineage of the metadata record.
<metadata_language_and_character_set-0-dataset_language>Language of the metadata record, currently onlyenglishis supported.
<metadata_language_and_character_set-0-metadata_language>Language for the metadata, currently onlyEnglishis supported.
<metadata_language_and_character_set-0-dataset_character_set>Full name of the character coding standard used for the metadata record, currently onlyUCS-2is supported.
<metadata_language_and_character_set-0-metadata_character_set>Full name of the character coding standard used for the metadata, currently onlyUCS-2is supported.
<distribution_format-0-name>Name of the data transfer format.
<distribution_format-0-version>Version of the data transfer format (date, number, etc).
<spatial>The geographic bounding box of the metadata record. Must be made up of four coordinates.
<spatial_parameters-0-equivalent_scale>Level of detail expressed as the scale of a comparable hardcopy map or chart. Provide it as the denominator of a representative fraction, i.e. the number below the line in a vulgar fraction.
<spatial_parameters-0-spatial_representation_type>Method used to spatially represent geographic information, this must be expressed as a number (e.g. 001 is used to represent Vector data).
<spatial_parameters-0-spatial_reference_system>Name of spatial reference system, provided as a colon-separated sequence (e.g. EPSG:4326). It is recommended to use the EPSG spatial catalogue codes whenever possible. Alternatively it is recommended to use a reference as shown on the www.spatialreference.org website, which features EPSG, ESRI and user-defined references to well-known coordinate reference systems.
<metadata_reference_date_and_stamp-0-stamp>This is the creation date and time of the metadata record. It must be in the yyyy-mm-ddTHH:MM:SS format (e.g 2023-04-12T13:15:36).
<metadata_reference_date_and_stamp-0-stamp_date_type>This must always beCreation
Before creating a record via the system API you will need to generate your API key to add to the curl command later:
- To get your API key, navigate to your profile

- Then click on 'Manage'

Scroll to the bottom of the page and click on 'Regenerate API Key'. (Note: If you already have an API key for your profile you don't need to regenerate one but you can)

The site will redirect you back to your profile page, where you can find your API Key on the left-hand side

Now navigate to the the instructions for your operating system below:
Notes for Windows users:
Any windows above Windows 10 should have curl preinstalled. In the Command Prompt terminal you can run this command to verify that curl is working (to run a command, paste/type the command and then hit Enter):
curl www.google.com

If you are unable to use the Command Prompt, use Windows Powershell.

If curl is working, your output should look something like this:


Next, In a notepad, paste your API key.
Go to the XML file you want to upload on your computer and copy the path.

If you don’t have a ‘Copy path’ button at the top of your page, right-click on the XML file and the ‘Copy path’ option should be in that menu. Paste your path underneath your API key in your notepad.
Copy the following command and paste it below your file path in your Notepad.
curl -H "Authorization: Your-API-key" -X POST -F "xml_dataset_files=@path-to-your-xml-file" https://catalogue-staging.sasdi.gov.za/dataset/xml_parser/ --insecure
If you are using Windows Powershell, use the following command that has ‘curl.exe’ instead of just ‘curl’.
curl.exe -H "Authorization: Your-API-key" -X POST -F "xml_dataset_files=@path-to-your-xml-file" https://catalogue-staging.sasdi.gov.za/dataset/xml_parser/ --insecure
Your notepad should now look like this:

First, replace the Your-API-key with your API key in your notepad.
curl -H "Authorization: Your-API-key" -X POST -F "xml_dataset_files=@path-to-your-xml-file" https://catalogue-staging.sasdi.gov.za/dataset/xml_parser/ --insecure
Will become:
curl -H "Authorization:80ebd870-030f-48bf-adbf-35e70c7a9691" -X POST -F "xml_dataset_files=@path-to-your-xml-file" https://catalogue-staging.sasdi.gov.za/dataset/xml_parser/ --insecure

Second, remove the inverted commas from your path and then where the command says "path-to-your-xml-file", add your file path in place of it.
curl -H "Authorization:80ebd870-030f-48bf-adbf-35e70c7a9691" -X POST -F "xml_dataset_files=@path-to-your-xml-file" https://catalogue-staging.sasdi.gov.za/dataset/xml_parser/ --insecure
Will become:
curl -H "Authorization:80ebd870-030f-48bf-adbf-35e70c7a9691" -X POST -F "xml_dataset_files=@C:\Users\Thiasha\Documents\emc\Training data custodians\data\bulk_testing.xml" https://catalogue-staging.sasdi.gov.za/dataset/xml_parser/ --insecure
Copy your new curl command with your API key and file path, paste it into your Command Prompt or Windows Powershell, and hit enter. If your files were uploaded successfully, your output should specify that all packages were created.

To upload more than one XML file at a time, copy the paths of all the files you want to upload and paste them into your notepad.

Copy the following prompt:
curl -H "Authorization: Your-API-key" -X POST -F "xml_dataset_files[]=@path-to-your-first-xml-file" -F "xml_dataset_files[]=@path-to-your-second-xml-file" -F "xml_dataset_files[]=@path-to-your-third-xml-file" https://catalogue-staging.sasdi.gov.za/dataset/xml_parser/ --insecure
For every XML file you want to add, add:
-F "xml_dataset_files[]=@path-to-your-xml-file"
Follow the steps above to add your API key and add the paths to your XML files.
Eg. I want to upload two XML files so my command prompt looks like this:
curl -H "Authorization: 48371ef4-33f6-407f-975c-9ac2110edc95" -X POST -F "xml_dataset_files[]=@C:\Users\Thiasha\Documents\emc\Training data custodians\data\bulk_testing_2.xml" -F "xml_dataset_files[]=@C:\Users\Thiasha\Documents\emc\Training data custodians\data\bulk_testing_1.xml" https://catalogue-staging.sasdi.gov.za/dataset/xml_parser/ --insecure

Notes for Linux users:
You will need to install curl on your machine. To do so, look at the curl website or use your preferred search engine to find instructions on how to install curl on your operating system, or follow these instructions:
Open your terminal (Ctrl+Alt+T) and then run this command in your terminal (You will be prompted for a password where you need to enter your password that you use to log on to your machine):
sudo apt update && sudo apt upgrade

Then run:
sudo apt install curl

Note: The example machine already had curl installed so your results should differ slightly here.
Next, run this command to make sure curl is installed on your machine:
curl --version

To create a record via the system API, open your computer's terminal/command line (if it isn't already open) and enter the curl command:
curl -H "Authorization: Your-API-key" -X POST -F xml_dataset_files=@path-to-your-xml-file https://"site-url"/dataset/xml_parser/
Your-API-key: Copy your API key that you generated earlier from the site and then paste it into the curl command.@path-to-your-xml-file: This is the path to the XML file on your computer.- The path should look something like
@C:\Users\User Name\Documents\XML_file.xmlon Windows and@/home/User/Documents/XML_file.xml - The
@symbol is very important in the command, DO NOT REMOVE IT!
- The path should look something like
"site-url": This is the URL of the site you are working on (e.g.emc.sasdi.gov.za).
Note: for the staging site url (i.e. https://catalogue-staging.sasdi.gov.za/) use the curl command:
curl -H "Authorization: Your-API-key" -X POST -F xml_dataset_files=@path-to-your-xml-file https://catalogue-staging.sasdi.gov.za/dataset/xml_parser/ --insecure
Note for MacOS users:
You will need to install curl on your machine. To do so, look at the curl website or use your preferred search engine to find instructions on how to install curl on your operating system, or follow the method below for installing curl on MacOS is via Homebrew:
-
Open the Terminal by going to Applications > Utilities > Terminal.
Then install Homebrew by running this command in the terminal:
/bin/bash -c "$(curl -fsSL https://raw.githubusercontent.com/Homebrew/install/HEAD/install.sh)"
Your password may be requested after running that command. Enter your password that you use to login in to your machine, after which a list of what will be installed will appear. PressReturn/Enterto confirm the installation.
The command will install:
/usr/local/bin/brew

	/usr/local/share/doc/homebrew

	/usr/local/share/man/man1/brew.1

	/usr/local/share/zsh/site-functions/_brew

	/usr/local/etc/bash_completion.d/brew

	/usr/local/Homebrew
PressReturn/Enterto continue or press any other key to abort:
Your terminal will then show:
Downloading and installing Homebrew…
After the download has completed you can follow these optional commands:
-
Run these two commands in your terminal to add Homebrew to your PATH (replace {user}):
(echo; echo 'eval "$(/usr/local/bin/brew shellenv)"') >> /Users/{user}/.zprofile eval "$(/usr/local/bin/brew shellenv)" -
Run
brew helpto get started -
Further documentation: https://docs.brew.sh
-
Finally, Install Curl by running this code in the terminal.
brew install curl
A successful installation provides curl caveats and a summary.
Caveats
curl is keg-only, which means it was not symlinked into /usr/local, because macOS already provides this software and installing another version in parallel can cause all kinds of trouble.
If you need to have curl first in your PATH, run:
echo 'export PATH="/usr/local/opt/curl/bin:$PATH"' >> ~/.zshrc
For compilers to find curl you may need to set:
export LDFLAGS="-L/usr/local/opt/curl/lib"

	export CPPFLAGS="-I/usr/local/opt/curl/include"
Now, open your computer's terminal/command line and enter the curl command.
curl -H "Authorization: Your-API-key" -X POST -F xml_dataset_files=@path-to-your-xml-file https://"site-url"/dataset/xml_parser/
Your-API-key: Copy your API key that you generated earlier from the site and then paste it into the curl command.@path-to-your-xml-file: This is the path to the XML file on your computer.- The path should look something like
@C:\Users\User Name\Documents\XML_file.xmlon Windows and@/home/User/Documents/XML_file.xml - The
@symbol is very important in the command, DO NOT REMOVE IT!
- The path should look something like
"site-url": This is the URL of the site you are working on (e.g.emc.sasdi.gov.za).
Note: for the staging site url (i.e. https://catalogue-staging.sasdi.gov.za/) use the curl command:
curl -H "Authorization: Your-API-key" -X POST -F xml_dataset_files=@path-to-your-xml-file https://catalogue-staging.sasdi.gov.za/dataset/xml_parser/ --insecure
Expected results: A Metadata record is created via system API.
On Linux, MacOS and Windows you should get an output similar to the image below in your terminal:

OR

RF25: Create Metadata Record Programmatically by Means of Performing Harvesting on Remote
Metadata Catalogues.
Applicable roles: Metadata Editor, Metadata Publisher and System Administrator
Procedure:
Select ‘Publish Metadata’ in the navigation bar.

Click on 'Harvesting' at the bottom right of the page.
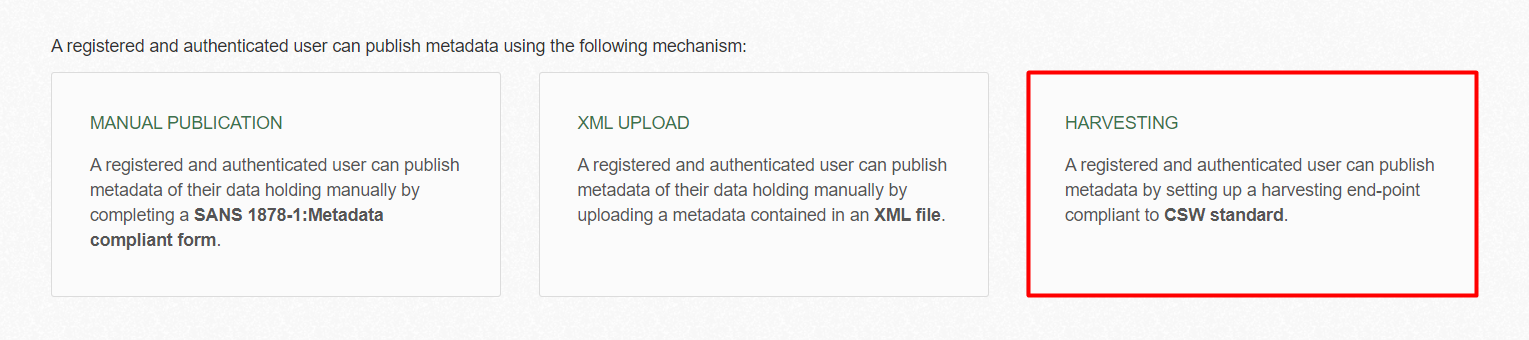
Alternatively, click on the drop-down under your username on the top right-hand corner of the page and select 'Harvesting Settings'.

Click on ' Add Harvest Source'.

Fill out the form by adding your harvester URL and click 'Save'.


The rest of RF25 will be documented when Remote Harvesting is deployed on the system
Expected results: Successful harvesting from a remote catalogue metadata source
RF26: Perform Bulk Import of Metadata Records via the System CLI.
Applicable roles: Metadata Editor, Metadata Publisher and System Administrator
Procedure:
Create multiple XML files on your machine following the example in RF24.
Linux and MacOS users should run this curl command:
curl -H "Authorization: Your-API-key" -X POST -F xml_dataset_files=@path-to-your-xml-file-1 -F xml_dataset_files=@path-to-your-xml-file-2 -F xml_dataset_files=@path-to-your-xml-file-3 https://"site-url"/dataset/xml_parser/
Note: for the staging site url (i.e. https://catalogue-staging.sasdi.gov.za/) use the curl command:
curl -H "Authorization: Your-API-key" -X POST -F xml_dataset_files=@path-to-your-xml-file https://catalogue-staging.sasdi.gov.za/dataset/xml_parser/ --insecure
Windows users might encounter an error in which case they should try this curl command:
curl -H "Authorization: API key" -X POST -F "xml_dataset_files=@path-to-your-xml-file-1" -F "xml_dataset_files=@path-to-your-xml-file-2" -F "xml_dataset_files=@path-to-your-xml-file-3" https://site-url/dataset/xml_parser/ --ssl-no-revoke
Note: for the staging site url (i.e. https://catalogue-staging.sasdi.gov.za/) use the curl command:
curl -H "Authorization: API key" -X POST -F "xml_dataset_files=@path-to-your-xml-file-1" -F "xml_dataset_files=@path-to-your-xml-file-2" -F "xml_dataset_files=@path-to-your-xml-file-3" https://catalogue-staging.sasdi.gov.za/dataset/xml_parser/ --insecure
You can link to as many valid xml files as you would like as long as they are on your local machine. When you run the command and the records are succesfully created you should get a response like in the image below:

Expected results: Successfully upload multiple metadata records at once.
RF27: Edit Owned Metadata Record.
Applicable roles: Metadata Editor, Metadata Publisher and System Administrator
and
RF28: Edit Metadata Record Interactively via the System UI.
Applicable roles: Metadata Editor, Metadata Publisher and System Administrator
Procedure:
To edit a metadata record that you have uploaded, click on your profile drop-down menu and select the 'Profile' option.

You should now see all the records you have created. Select the record you would like to edit. Select the manage option on the right-hand side of the screen.

Edit/Update the metadata record information and then click 'Update metadata record' at the bottom of the page.

Alternatively, you can find the record in your organisation and edit it from there.
Expected results: You should be able to edit all of your owned metadata records.
RF30: Delete Owned Metadata Record that is Private.
Applicable roles: Metadata Editor, Metadata Publisher and System Administrator
and
RF31: Delete Owned Metadata Record that has been Published.
Applicable roles: Metadata Publisher and System Administrator
Procedure:
Select the metadata record you want to delete and select 'Manage'.

Scroll down to the bottom and select 'Delete'.

Expected results: You can successfully delete your record that is private or owned metadata record that has been published
RF32: Publish Owned Metadata Record.
Applicable roles: Metadata Publisher and System Administrator
Procedure:
To publish a metadata record you own, you need Stem Admin or Publisher permissions. Navigate to the menus bar and click on the user profile icon.

On the list, select 'Dashboard'.

On the 'Dashboard', select 'My Metadata Records'. You will see a list of records that you have created.
Note: The metadata record is currently private, as indicated with a grey icon.

Open the record you want to publish and click 'Manage'.

When your record is opened, scroll down to 'Visibility'. From the list provided, change the visillity to 'Public'.

Scroll down to the bottom of the form, and click on 'Update Dataset'

Expected results: Your record should be published (image below) (Private icon removed). Publishing a metadata record publicly corresponds to making it visible to Anonymous Users (R1).

RF33: Create a Metadata Record in a Non-owned Organisation.
Applicable roles: System Administrator
Procedure:
As with RF32, the procedure to create a metadata record remains the same. However, to create the record in a non-owned organisation, you will need to add the organisation by selecting the desired one from the drop-down menu.

Expected results: Your record should be created in the non-owned organisation selected.
RF34: Edit Non-owned Metadata Record.
Applicable roles: System Administrator
Procedure:
Select the metadata record you want to edit and select 'Manage' on the right-hand side of the screen.
Edit/Update the metadata record information and then click 'Update metadata record' at the bottom of the page.
Expected results: You can successfully edit a record that you do not own.
RF35: Delete Non-owned Metadata Record.
Applicable roles: System Administrator
Procedure:
Select the metadata record you want to delete and select 'Manage'.

Scroll down to the bottom and select 'Delete'.

Expected results: You can successfully delete a record that you do not own.
RF36: Publish Non-owned Metadata Record.
Applicable roles: System Administrator
Procedure:
As a System Administrator, click on 'Search Metadata' in the navigation bar and then select any private Metadata Record that isn't owned by you.

Click on 'Manage'.

Scroll down and change the “Visibility” from 'Private' to 'Public'.

Go to the bottom of the page and click on 'Update metadata record'.
Expected results: A System Administrator user can publish metadata records that they do not own.
RF37: Add Harvester of Remote Source of Metadata Records.
Applicable roles: System Administrator
and
RF39: Configure Harvesting of Remote Source of Metadata Records.
Applicable roles: Metadata Publisher and System Administrator
Procedure:
Select ‘Publish Metadata’ in the navigation bar.

Click on 'Harvesting' at the bottom right of the page.
Alternatively, click on the drop-down under your username on the top right-hand corner of the page and select 'Harvesting Settings'.
Click on 'Add Harvest Source'.
Fill out the form by adding your harvester URL and click 'Save'.
Expected results: The successful creation of a new harvest source.
RF38: Delete Existing Harvester of Remote Source of Metadata Records.
Applicable roles: System Administrator
Procedure:
Select the harvest source you want to delete and then select 'Admin'.

Go to 'Edit'.

Scroll down to the bottom of the page and click on the 'Delete' drop-down. Select whether you would like to delete the source or delete and clear the source.

Expected results: Successful deletion of a harvesting source.